Props
In React, props are used to share values or functionality between components. They are one of the fundamental concepts in React and play a crucial role in building applications.
- Props are used to share values and functionality between components in React.
- Props are passed from parent components to child components.
- Props are accessed using
this.props.propertyNamesyntax in class components. - Props can be passed as attributes in JSX, similar to assigning attributes to HTML elements.
- It is important to pass
propsto the constructor of the child component and callsuper(props)to be able to accessthis.propsin the child component. - Props can be used with both class components and functional components. In functional components, props are passed as a parameter to the function. Refer to the Official React documentation to see how functional components can be used with props.
- Props can be functions, and they can be attached to events in JSX by assigning them to the appropriate event attribute.
- Event attributes in JSX must be camelCased.
- JavaScript code in JSX must be wrapped in curly braces.
- When passing multiple props to a component, destructuring can be used to simplify the code.
- Destructuring allows accessing props directly by their names instead of using
this.props.propertyName. - Binding
thisis necessary when passing methods from one component to another to ensure the correct context is maintained. - Binding can be done using the
bind()method in the constructor of the component. - Destructuring is also applicable in class components when accessing props.
Code examples
Example 1:
// MyComponent.js

import React, { Component } from 'react';

class MyComponent extends Component {
  constructor(props) {
    super(props);
  }

  render() {
    return (
      <div>
        <h1>{this.props.title}</h1>
      </div>
    );
  }
}

export default MyComponent;
// App.js

import React, { Component } from 'react';
import MyComponent from './MyComponent';

class App extends Component {
  constructor(props) {
    super(props);
  }

  render() {
    return (
      <div>
      {/* props here are title */}
        <MyComponent title="React" />
      </div>
    );
  }
}

export default App;
In this example, there are two components: MyComponent and App. The MyComponent component is imported into App and rendered as a child component of App. In the JSX where MyComponent is implemented, a property called title is passed down as a prop. This is similar to assigning attributes to HTML elements. The value of the title prop is set to "React". Inside the MyComponent component, the title prop can be accessed using this.props.title.
It’s important to note that the props parameter is passed to the constructor of the child component (MyComponent) using super(props). This ensures that this.props.title can be accessed correctly within MyComponent. The super() method is called with props as an argument to invoke the constructor of the parent class (Component).
Example 2:
// MyComponent.js

import React, { Component } from 'react';

class MyComponent extends Component {
  constructor(props) {
    super(props);
  }

  render() {
    return (
      <div>
        <h1>{this.props.title}</h1>
        <button onClick={this.props.onButtonClicked}>Click Me!</button>
      </div>
    );
  }
}

export default MyComponent;
// App.js

import React, { Component } from 'react';
import MyComponent from './MyComponent';

class App extends Component {
  constructor(props) {
    super(props);

    this.onClickBtn = this.onClickBtn.bind(this);
  }

  onClickBtn() {
    console.log('Button has been clicked!');
  }

  render() {
    return (
      <div>
        {/* props here are title and onButtonClicked */}
        <MyComponent title="React" onButtonClicked={this.onClickBtn} />
      </div>
    );
  }
}

export default App;
In this example, the MyComponent component is similar to the previous example, but it includes an additional prop called onButtonClicked. The onButtonClicked prop is assigned to the onClick event of a button element within MyComponent.
In the App component, a method called onClickBtn is defined. This method will be executed when the button inside MyComponent is clicked. The onClickBtn method simply logs a message to the console. The onClickBtn method is passed to MyComponent as a prop with the name onButtonClicked.
To ensure that this refers to the correct context within the onClickBtn method, it needs to be bound to the component instance. This is done in the constructor of the App component using `this.onClickBtn = this.onClickBtn.bind(this)
. By binding the method, we create a new function with this` bound to the original component, ensuring that the method is always executed in the correct context.
Special Note 1: Instead of using addEventListener to add event listeners, React allows us to assign event handlers directly in the JSX. However, the event attributes must be camelCased. A list of supported events can be found here.
Special Note 2: The function this.props.onButtonClicked is wrapped in curly braces because JSX needs a way to distinguish between JavaScript code and regular HTML elements. Curly braces indicate that JavaScript is being used in the JSX, and the expression inside the braces is evaluated as JavaScript code.
Additionally, a more concise way of accessing props within the render method of a class component is by using destructuring. By destructuring this.props within the render method, the individual props can be accessed directly without using this.props repeatedly.
// MyComponent.js

import React, { Component } from 'react';

class MyComponent extends Component {
  constructor(props) {
    super(props);
  }

  render() {
    const { title, onButtonClicked } = this.props;

    return (
      <div>
        <h1>{title}</h1>
        <button onClick={onButtonClicked}>Click Me!</button>
      </div>
    );
  }
}

export default MyComponent;
In the above code snippet, the title and onButtonClicked props are destructured from this.props. This allows them to be directly accessed within the render method without using this.props.title or this.props.onButtonClicked.
Understanding the purpose and usage of props in React is essential for building components that can share data and functionality. By passing props from parent components to child components, you can create a modular and reusable code structure.
Data Transfer in React
In React, data is transferred from parent components to child components via props. This data transfer is unidirectional, meaning it flows in only one direction. Any changes made to this data will only affect child components using the data, and not parent or sibling components. This restriction on the flow of data gives us more explicit control over it, resulting in fewer errors in our application.
Using Props(functional components)
Consider a Button component that gets rendered multiple times within an App component.
function Button() {
  return (
    <button>Click Me!</button>
  )
}

export default function App() {
  return (
    <div>
      <Button />
      <Button />
      <Button />
    </div>
  )
}
Problem with Static Components
What if we want the text within the second button to be “Don’t Click Me!”? Right now, we would have to create a second button component with this different text. This approach leads to code duplication.
function Button() {
  return (
    <button>Click Me!</button>
  )
}

function Button2() {
  return (
    <button>Don't Click Me!</button>
  )
}

export default function App() {
  return (
    <div>
      <Button />
      <Button2 />
      <Button />
    </div>
  )
}
Solution: Dynamic Components with Props
By using props, we can account for any number of variations with a single button component.
function Button(props) {
  const buttonStyle = {
    color: props.color,
    fontSize: props.fontSize + 'px'
  };

  return (
    <button style={buttonStyle}>{props.text}</button>
  )
}

export default function App() {
  return (
    <div>
      <Button text="Click Me!" color="blue" fontSize={12} />
      <Button text="Don't Click Me!" color="red" fontSize={12} />
      <Button text="Click Me!" color="blue" fontSize={20} />
    </div>
  );
}
Prop Destructuring
A common pattern is prop destructuring. Unpacking props in the component arguments allows for more concise and readable code.
function Button({ text, color, fontSize }) {
  const buttonStyle = {
    color: color,
    fontSize: fontSize + "px"
  };

  return <button style={buttonStyle}>{text}</button>;
}
Default Props
To avoid repeating common prop values and to protect our application from undefined values, we can define default props that will be used by the component when no values are supplied.
function Button({ text, color, fontSize }) {
  const buttonStyle = {
    color: color,
    fontSize: fontSize + "px"
  };

  return <button style={buttonStyle}>{text}</button>;
}

Button.defaultProps = {
  text: "Click Me!",
  color: "blue",
  fontSize: 12
};

export default function App() {
  return (
    <div>
      <Button />
      <Button text="Don't Click Me!" color="red" />
      <Button fontSize={20} />
    </div>
  );
}
Functions as Props
In addition to passing variables through props, you can also pass through functions. Here’s an example:
function Button({ text = "Click Me!", color = "blue", fontSize = 12, handleClick }) {
  const buttonStyle = {
    color: color,
    fontSize: fontSize + "px"
  };

  return (
    <button onClick={handleClick} style={buttonStyle}>
      {text}
    </button>
  );
}

export default function App() {
  const handleButtonClick = () => {
    window.location.href = "http://www.google.com";
  };

  return (
    <div>
      <Button handleClick={handleButtonClick} />
    </div>
  );
}
This example shows how a function (handleButtonClick) is defined in the parent component and passed as a prop to the Button component.
Additional Notes
- We only pass a reference to the function without including parentheses, i.e.,
handleClick={handleButtonClick}. If we include parentheses likehandleClick={handleButtonClick()}, the function would be called as the button renders. - Prop names and values do not need to be the same; we can rename the function when passing it as a prop.
- You can supply parameters to the function by attaching a reference to an anonymous function within the component where the function is called.
For more information on props, check out Passing Props to a Component
State
In React, state is used to handle values that can change over time. It allows us to manage dynamic data in our components. State is one of the core concepts in React and plays a crucial role in building interactive and dynamic applications.
- State is used to handle values that can change over time in React.
- The
stateis an object that holds the mutable data for a component. - State is declared and initialized in the constructor of a class component using
this.state = { ... }. - In the example, a simple counter app is shown.
- The initial state is set with
countproperty initialized to 0. - The
setState()method is used to update the state. It takes an object as an argument, and properties within that object are merged into the current state. - It’s important to treat state as immutable and avoid directly changing the state without using
setState(). Modifying state directly can lead to unexpected behavior or bugs. - The
countUpmethod is defined to update the count value by incrementing it by 1. - In the constructor, the
countUpmethod is bound to the component instance usingbind()to maintain the correct context ofthis. - In the render method, the current value of
countis accessed usingthis.state.count. - The count value is displayed within a paragraph element using JSX.
- When the button is clicked, the
countUpmethod is called, which updates the state and triggers a re-render of the component. - Destructuring can also be used to directly access state properties without using
this.state. - In React, it is legal and powerful to pass one component’s state down to multiple children components.
- This allows for the sharing of state among components and ensures that when the state is changed, each child component using that state is automatically re-rendered with the new value.
It’s important to note that the provided example uses class components to handle state. State management can also be achieved using functional components with hooks like useState(). Refer to the Official React Documentation.
Code Example
import React, { Component } from 'react';

class App extends Component {
  constructor() {
    super();

    this.state = {
      count: 0,
    };

    this.countUp = this.countUp.bind(this);
  }

  countUp() {
    this.setState({
      count: this.state.count + 1,
    });
  }

  render() {
    return (
      <div>
        <button onClick={this.countUp}>Click Me!</button>
        <p>{this.state.count}</p>
      </div>
    );
  }
}
In this example, we have a simple counter application. The App component extends the Component class from React.
State is declared in the constructor of the App component using the this.state syntax. The initial state is defined as an object with a property count set to the value 0. It’s important to note that state should always be declared in the constructor of a class component. (Functional components have a different approach to handling state, which will be covered later.)
The countUp method is defined within the App component. It uses the setState method provided by React to update the state. Inside setState, we pass an object that represents the new state we want to set. In this case, we increment the value of count by 1.
To ensure that this refers to the correct context within the countUp method, it needs to be bound to the component instance. This is done in the constructor using this.countUp = this.countUp.bind(this). Binding the method allows it to access the correct instance of the component and its state.
In the render method, we define the JSX that will be rendered. It includes a button with an onClick event that triggers the countUp method. When the button is clicked, the countUp method is called, updating the state and triggering a re-render of the component. The current value of count from the state is displayed using {this.state.count}.
It’s worth mentioning that state in React should be treated as immutable. This means that you should not directly modify the state, but instead use the setState method provided by React to update it. Modifying state directly can lead to unexpected behavior or bugs.
By properly managing state, you can create interactive components that respond to user interactions and update their display accordingly.
Passing State as Props
Yes, it is perfectly legal and powerful to pass state as a prop in React. It allows you to share a piece of state from a parent component to multiple child components. When the state is updated, each child component using that state will automatically re-render with the new value.
Let’s consider an example where we have a forum webpage. The main component of the site is called Forum, and it needs to know the user’s username. When a user views a post or reply they wrote, the author should be displayed as “me” instead of their username.
To achieve this, we can keep the username as a piece of data in the state of a parent component, let’s call it App. By keeping the username in the state of App, we can pass it down as a prop to both the NavBar component and the Forum component.
Here’s an example of how it can be implemented:
// App.js

import React, { Component } from 'react';
import NavBar from './NavBar';
import Forum from './Forum';
import Footer from './Footer';

class App extends Component {
  constructor(props) {
    super(props);
    this.state = {
      username: 'user123',
    };
  }

  render() {
    return (
      <div>
        <NavBar username={this.state.username} />
        <Forum username={this.state.username} />
        <Footer />
      </div>
    );
  }
}

export default App;
In the App component’s render method, we pass the username state as a prop to both the NavBar component and the Forum component. By doing so, any changes to the username state will automatically trigger a re-render of both the NavBar and Forum components, reflecting the updated value.
The Footer component, on the other hand, does not need access to the username state, so it is not passed as a prop to that component. As a result, the Footer component will not re-render when the username state changes.
This approach provides a clean and efficient way to share state between components, allowing for better organization and separation of concerns.
What is State in React?
State is a crucial concept in React, especially when dealing with dynamic user interfaces. It allows components to remember and manage information about themselves. State represents a component’s memory, enabling it to undergo visual changes based on user or computer interactions.
Code example, App that changes its background color based on the clicked button:
import React, { useState } from "react";
import "./App.css";

const COLORS = ["pink", "green", "blue", "yellow", "purple"];

function App() {
  const [backgroundColor, setBackgroundColor] = useState(COLORS[0]);

  const onButtonClick = (color) => () => {
    setBackgroundColor(color);
  };

  return (
    <div
      className="App"
      style=
    >
      {COLORS.map((color) => (
        <button
          type="button"
          key={color}
          onClick={onButtonClick(color)}
          className={backgroundColor === color ? "selected" : ""}
        >
          {color}
        </button>
      ))}
    </div>
  );
}

export default App;
In this example, the useState hook is used to define a state variable called backgroundColor. The onButtonClick function is a click event handler that updates the backgroundColor state when a button is clicked, resulting in a color change for the app’s background.
The useState Hook
The useState hook is a built-in hook in React that allows functional components to have their own state. It takes an initial value as a parameter and returns an array with two elements:
- The current state value
- A function to update the state value
Here’s the basic pattern for using useState:
const [stateValue, setStateValue] = useState(initialValue);
In the provided example, the backgroundColor state is defined using the useState hook, allowing the component to keep track of the current background color.
How does State work in React?
In React, when a component’s state or props change, the component is rerendered, which means it’s destroyed and recreated from scratch. The entire component is recreated, but the latest state value is retained. This process of comparing and updating the UI efficiently is handled by React’s reconciliation algorithm, which operates on a virtual DOM.
The useState hook plays a significant role in this process. When the useState value changes, the component is scheduled for rerendering, and the new state value is provided to the component.
This concept is illustrated by the following diagram:
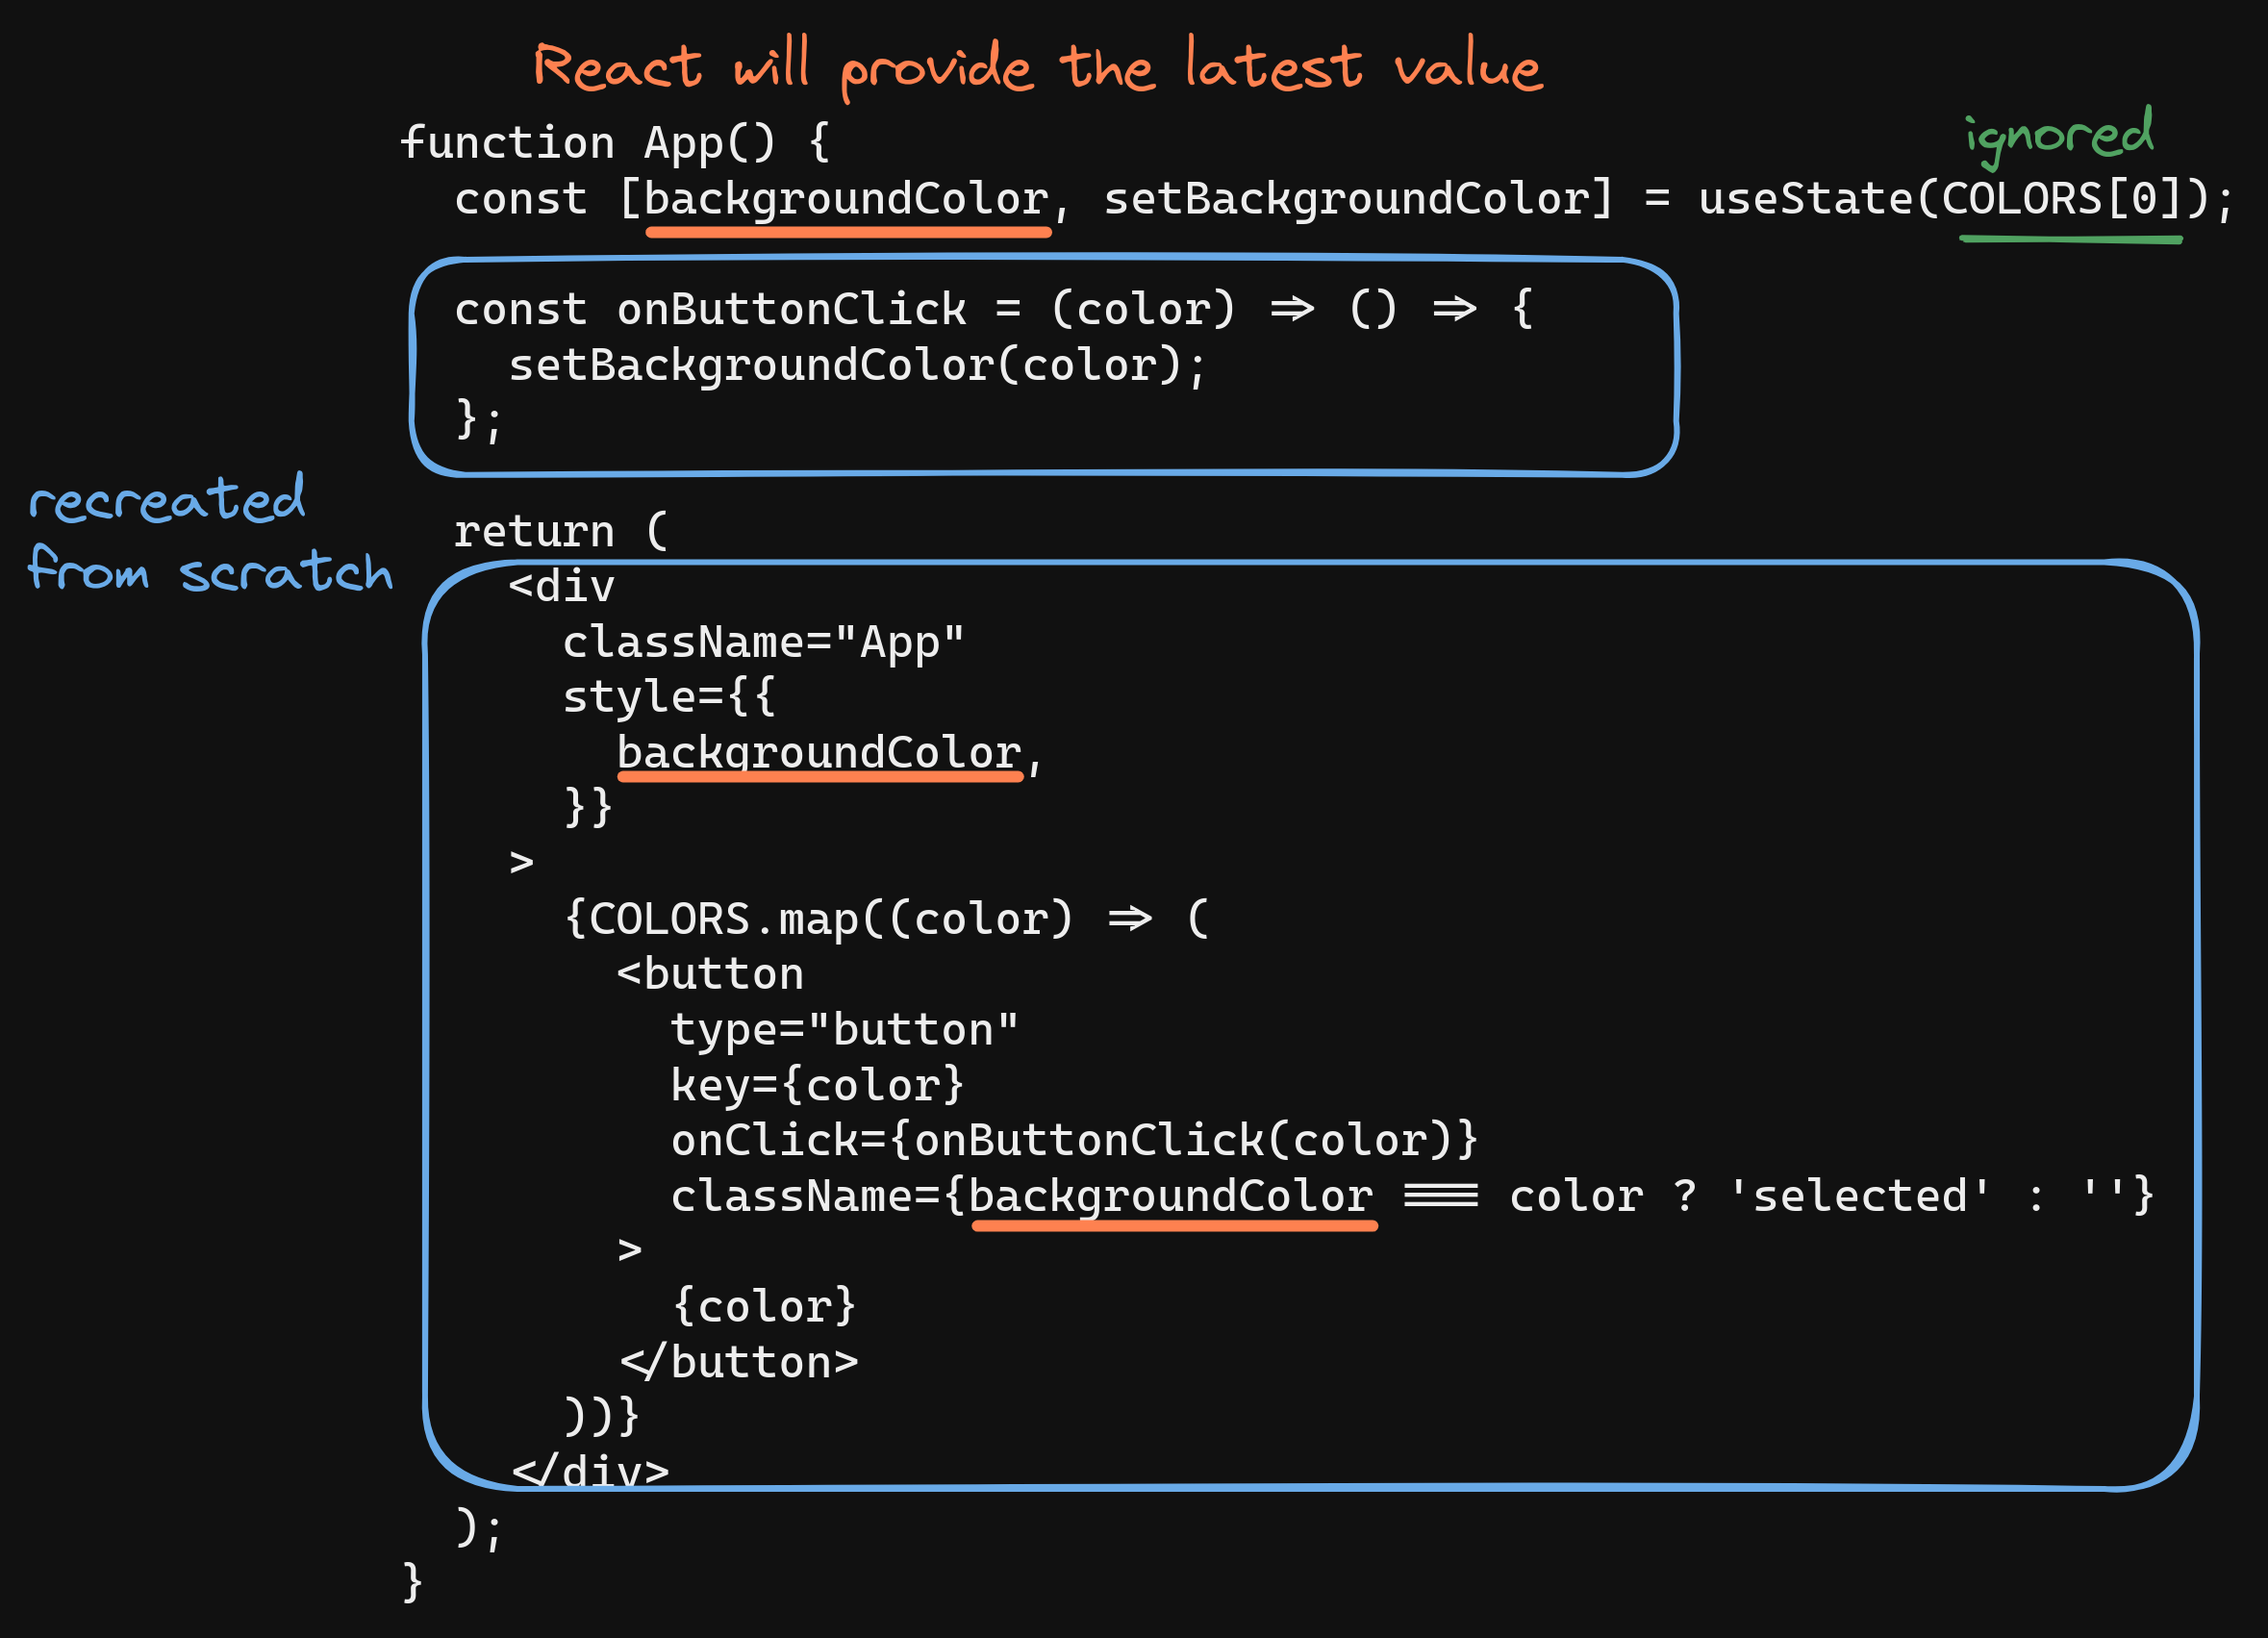
In the code example, the backgroundColor state change triggers a rerendering of the App component, ensuring that the latest color is applied to the background.
Hooks and Rules
Hooks in React are functions that allow you to use various features. All hooks have the “use” prefix, like useState. It’s essential to follow certain rules when using hooks:
- Hooks can only be called from the top level of a functional component.
- Hooks can’t be called from inside loops or conditions.
These rules help ensure that hooks work correctly and maintain consistent behavior in React components. As you continue your React journey, you’ll encounter more hooks that enhance the functionality of your components.
State and props in functional components
- React provides the ability to create components as functions, called functional components.
- In functional components, props are not passed as an argument to the constructor but as an argument to the component itself.
- The main difference in accessing props between class components and functional components is that in class components, props are accessed using
this.props.someFunction, while in functional components,thisis not used, and props are accessed directly asprops.someFunction. - Here’s an example to illustrate the difference:
// MyComponent.js

import React from 'react';

function MyComponent(props) {
  return <div>{props.title}</div>;
}

export default MyComponent;
// App.js

import React from 'react';
import MyComponent from './MyComponent';

function App() {
  return (
    <div>
      <MyComponent title="Hello World" />
    </div>
  );
}

export default App;
- In the example above,
MyComponentis a functional component that receives props as an argument. Thetitleprop is accessed directly asprops.titlewithin the component. - Similarly, the
Appcomponent is also a functional component that renders theMyComponentcomponent with thetitleprop set to"Hello World". - Destructuring can also be used to simplify accessing props within a functional component. By destructuring
titlefrompropsin the function’s parameter parentheses or usingconst {title} = propswithin the function, thetitleprop can be directly referenced as{title}within the component. ```javascript // MyComponent.js
import React from ‘react’;
function MyComponent({title}) { return <div>{title}</div>; }
export default MyComponent; ```
Using state in functional components:
- Before the introduction of React Hooks, functional components were used only for returning JSX logic with props and could not access or manage state.
- With the introduction of React Hooks, state can now be set and accessed in functional components as well.
- Hooks allow for managing state and other React features in functional components, making them a preferred choice over class components in modern React development.
- Understanding both class components and functional components, including their usage of state and props, is crucial as a React developer.
Unidirectional data flow
- Unidirectional data flow is a technique used in React where data has one-way transfer from parent components to child components as props.
- React doesn’t support bi-directional binding to ensure a clean data flow architecture.
- State is owned by a single component in React, and changes in state only affect its child components.
- One-way data flow provides advantages such as easier debugging, better data control, and improved efficiency.
- By following unidirectional data flow, React ensures data flows in a single direction, giving better control and efficiency in managing data within the application.